Wednesday, October 16, 2013

Garfield Park Conservatory and Photography Class Week One


I've been wanting to take a photography class for awhile, and last week I happened upon a flier for the non-credit program at Northwestern University, Norris Mini Courses, just a few days before the class began.  It's a nice program, affordably priced, and not far from our house.  I also registered for a ceramics class, which I'll write about in a separate entry. 
 
I've had a lot of fun noodling around with the Cannon EOS Rebel T3i I got last summer, took an afternoon "how to use your camera" course thanks to my thoughtful husband, and did two short e-courses.  I was at a point I wanted technical help for tricky photo situations (e.g. lighting, movement), I was ready to expand my subjects, and I do well as a classroom learner.  The timing was also good, as I'm "less-employed" (the labor department would probably call the situation under-employed) and it is good to have a regular thing to do outside the house involving other people.      
 
Week One was mostly an overview of the course, introductions, and getting to know our cameras and the buttons and dials.  Reading the manual was one assignment.  I've been told numerous times to read the manual, and this time I actually did.  I wish I had sooner, good info in there!   
 
I had the idea to head to the Garfield Park Conservatory to take shots for the other assignment, which was to explore the camera settings and have a few images to share with the class.  I've only been to  Garfield Park one other time, in the late '90s, for the Dale Chihuly exhibit.  If you live in or visit the Chicago area, go to the Garfield Park Conservatory.  It's lovely, and visiting feels like a mini-adventure, definitely a respite from the urban environment.  And it's free!  There is a parking lot, I found easy street parking, and it is right by the green line "Conservatory" stop. 
 
The park is set within Chicago's boulevard system, traversing it makes me feel like I've stepped back in time.  Sadly, some boulevards run through neighborhoods that have declined.  As gentrification happens, areas have seen renewal.  There is a small gift shop at the Conservatory, but no other amenities, so eat before you go!  I found out too late there is a new Garfield Park location of Inspiration Kitchen nearby.  Next time I go to the Conservatory I'll plan to have a meal there. 
 
The Conservatory currently has a special Wind Chime exhibit until November 11.  A cheerful volunteer gave me a map and tips for my visit.  All ages were there, as well as a variety of group sizes and ethnicities.  There are a number of attractions geared toward children, and the kids I saw seemed to be having a great time.  Areas are under renovation, due to hail damage suffered during a storm a few years ago. 
 
Below are some images I took during my visit (and one taken by another visitor!).  The Garfield Park Conservatory is certainly a gem in Chicago, and I'm glad I took the time to go.  Drop me a note if you have suggestions for other photo adventures!        


Sunday, October 13, 2013

Rose's Famous Caramel Cake

Rose's Famous Caramel Cake
 
 
Surely Rose is a better woman than me for making this cake so often she become famous for it.  Rose Deshazer-White was (is?) a longtime South Side Chicago resident, this recipe appeared in the Chicago focused issue of Saveur magazine.  It is a delicious and impressive cake, but it is definitely a Special Occasion Cake.  First, it takes awhile, not the recipe to whip up for an impromptu gathering.  Secondly, it is a big, decadent cake; a little sliver is plenty.  You'll want a crowd to eat it up. 
 
Or maybe it would be more specific to say it is special occasion frosting.  It cooks for a long time, and needs just enough babysitting so you can't really be otherwise very productive.  The cake is pretty straightforward; a light, delicate-crumbed, buttery vanilla cake, made using a standard creaming method.  It would be quite nice with a fudge frosting, or even sliced strawberries and fresh whipped cream.  Heck, I was pretty happy eating the plain trimmed tops.      
 
I will also confess, caramel is something I struggle with in the kitchen.  It requires strict precision in technique and temperature.  A little cool and the caramel will be soft, too hot and it will be brittle.  Caramel waits for no cook, you must work quickly and carefully.  A caramel slip doesn't just burn, it brands the skin.  But not to dissuade you!  Maybe caramel isn't your white whale, it could be pie crust or soufflé or custard.  We all have something that doesn't come easily. 
 
This special occasion was a few weeks ago, the Second Annual Charity Auction BBQ.  The employees at the company where Adam works (Jellyvision - super cool company, check 'em out) contribute prizes, the employees bid on the prizes, and the funds raised go to charity.  Adam (and I) contributed BBQ (pulled pork and brisket), sides, and dessert.  Last year we brought the food to the winner's house, the same person won this year (and was pretty clear he would win again next year) and we hosted at our house. 
 
Try this for your next special occasion.  Drop me a note and post a photo of the finished product.  And let me know, what is your culinary challenge?

Hugs,
Tara
 
 
The cakes before leveling.
 
 
After adding the evaporated milk.  Stir stir stir! 
Be sure your pot has plenty of room for the bubbling mixture.
Add the milk very slowly and carefully, it will foam vigorously. 
 
 
The mixture is smooth, now to get it up to temperature. 
 
 
Almost there.
 
 
Off the heat, stir stir stir!
 
 
Frank during the dinner party.   
 
 
The reward for your efforts, time to eat Rose's Famous Caramel Cake!
 
 
Rose's Famous Caramel Cake
From Saveur Issue #105 
Makes one large cake
 

INGREDIENTS
16 tbsp. unsalted butter, softened
3¼ cups cake flour
1 tbsp. baking powder
½ tsp. salt
6¼ cups sugar
2 tsp. vanilla extract
4 eggs
1¼ cups milk
16 tbsp. salted butter
2 12-oz. cans evaporated milk
 
INSTRUCTIONS
1. Heat oven to 350°. Making sure all ingredients are at room temperature, grease two 9" round cake pans with 1 tbsp. unsalted butter; dust with 1½ tbsp. flour, tap out excess, and set aside. Sift flour, baking powder, and salt together; set aside. Beat remaining unsalted butter and 2½ cups sugar in a bowl with an electric mixer until fluffy. Add vanilla and eggs one at a time, beating after each addition. Add flour mixture and milk alternately in 3 batches, beating smooth after each addition. Divide batter between pans. Bake until golden, 30–35 minutes. Let cool on a rack for 10 minutes; remove cakes; let cool completely. Slice tops off cakes to level them.
 
2. To make icing, cook remaining sugar and salted butter in a pot over high heat, stirring constantly, until light brown, 7–8 minutes. Carefully stir in evaporated milk; reduce heat to medium-low; cook, stirring constantly, until smooth, 8–10 minutes. Cook, stirring occasionally, until icing registers 240° on a candy thermometer, about 1½ hours. Remove from heat; beat with a wooden spoon until thick, glossy, and spreadable, 20–25 minutes. (A dollop dropped on a plate should ooze only slightly.) Ice bottom layer of cake; top with second layer and ice the outside. Chill cake until set.


*****
 
"Like" the SBE companion Facebook page,
a community for sharing beauty found in everyday life.
 
*****


Thursday, October 10, 2013

Piefest XIV - The Event

Whose pie will reign supreme?


Sorry for the gap between posts about Piefest XIV!  To recap, Piefest is an annual event hosted by Evan and Sharma.  For details on our entry, check out the previous post.  Evan and Adam have both worked at Jellyvision for many years.  This year's Piefest was a little smaller than last year.  Which was just as well, the rainy weather had the event indoors and the space was bursting.  Also better for my stomach!  I learned previously it is important to pace yourself and practice portion management. 

Piefest has several categories.  The winners are selected democratically.  Everyone in attendance at the time of voting can fill out a ballot, regardless of pie entry.   

Categories:
Fruit
Cream 
Savory
Miscellaneous (anything not of the previous three)

Awards are given in the individual categories, as well as for:
Best Crust
Best in Show
Most Ambitious
Best Presentation
Most Original

FRUIT PIE ENTRIES

Nectarine and Raspberry Galette
**Winner - Best Fruit and also Best Presentation**


These were very delicious, and I thought a very clever idea for sharing! 


CREAM PIE ENTRIES

*Winner - Most Original*

I didn't catch the name if this, it was banana and I think chocolate,
and the crust was something with Golden Grahams.
*Winner - Best Cream*


SAVORY PIE ENTRIES

Ga Lei Gok (Curry, Water Chestnut, and Beef)


*Winner - Best Savory Pie*


Ali Baba and the Forty Leaves (sort of dolmades in pie form)


MISCELANEOUS PIE ENTRIES

*Winner - Best Crust*


*Winner - Best Miscellaneous Pie*
It was very delicious, and had the advantage of still being a bit warm. 


I apologize, I don't know who won Best in Show and Most Ambitious.  We didn't stay for the results, and didn't learn the winners until several weeks later when we saw Evan and Sharma at another event.  Not sure if I asked and forgot, or I forgot to ask.  So, we didn't emerge victorious, as last year.  But we did place second, which is pretty good considering it was a very crowded field and all the pies were quite delicious. 

Although I have a full stomach from dinner and even ate farmer's market cherry pie for dessert, thinking about Piefest still makes me want to eat pie!

Wishing you much sweetness in your life.

Hugs,
Tara


*****
 "Like" the SBE companion Facebook page,
a community for sharing beauty found in everyday life.
*****


Sunday, September 8, 2013

Piefest XIV - The Pie


Once again we participated in Piefest, a delicious and fun annual even held by a co-worker of Adam's, Evan, and his wife, Shama.  I'm breaking Piefest into two posts, one detailing the my contributions to the pie, and a second for the event itself.  

As we did last year, our pie was a team collaboration.  And again, we entered the savory category, making a riff on a beef stew / beef pot pie sort of thing.  Adam made the filling, and I did the crust, assembly, and baking.  First, the filling.  There wasn't a recipe per se.  Here is the gist: beef, carrots, onion, red wine, thyme, cooked for a long time in the crock pot.  If you're interested, let me know and I'll get some further details.  It tasted very good, I'd be happy to eat it again.    

On to the crust.  The recipe is a cross between a standard pie dough and a laminated dough.  Mixing starts as a pie dough, and is then processed like a laminated dough.  The result is a yummy, flaky crust.  I liked the dough a lot, not only for its taste and texture, but it was easy to roll out and work with.  If you've spent any time with pie dough, you know what a challenge it can be!  You have to work very quickly but delicately, and say prayers to the Dough Goddesses.  Our kitchen that afternoon was on the warm side, not at all ideal for assembling pie, but I had no issues.  It took some forethought and was more time consuming than a regular pie crust, but I think the results were well worth it.  

The recipe is adapted from Apricot Blackberry Hand Pies by baker Kim Boyce, owner of the Portland, OR bakery Bakeshop.  I heard an interview with her on NPR, and the crust seemed just perfect for our Piefest endeavor.  Link to the original recipe and the story here.  As the pies are meant to be handheld, they must be quite sturdy.  This sturdiness may be the one "con" in making it as a whole single pie.  The bottom crust was a little hard to cut.  But it could have also been the plastic pie server.  If we had a regular knife it may have been a non-issue.  

I began on Thursday evening after work.  I made the dough, and left it to chill and rest.  Straightaway after work on Friday I did the first rolling and folding.  We went to dinner, and afterward I did the second and third turns.  Back to the fridge.  Saturday morning I rolled the dough and put into the pie plate, and cut the top using a plate an inch or so larger than the pie plate.  This all went into the freezer on a sheet pan, and I went off to teach yoga classes.  Meanwhile, Adam had made and cooled the filling.  A few hours prior to Piefest, I assembled and baked.  A bit of the egg wash between the bottom and top helped seal together.  I was concerned about the filling oozing out, but it was just fine.  This timeline could probably be condensed, I just had to work in pockets of time due to my schedule.   

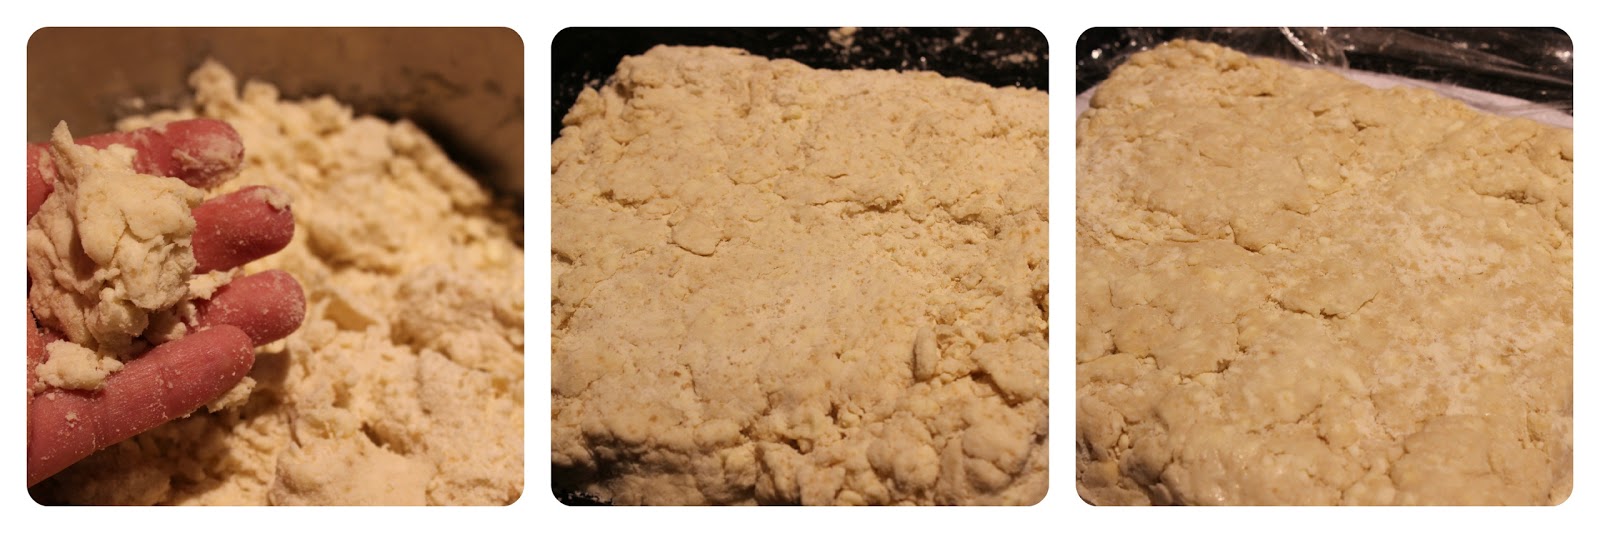
Squeezing the dough after ice water / the dough ready for the fridge / the dough after a chilly rest


First, second, and third roll and fold


Flaky Pie Dough
Adapted from Apricot Blackberry Hand Pies by Kim Boyce

Yield: two shallow 9" pies (top and bottom) + extra

Ingredients:

About 5 cups (600 grams)* all-purpose flour 
6 tablespoons (60 grams) sugar
1 tablespoon (10 grams) kosher salt**
500 grams (about 1 pound) unsalted butter, cut into 1/2 inch pieces
3/4 to 1-1/4 cups ice-cold water

For finish - one egg, whisked well

* Yay, I love when recipes have weight measurements!
** I weighed 1 tablespoon of kosher salt as 17 grams.  I did a quick check in The Joy of Cooking, and their pie crust had 1 teaspoon of salt for 2-1/2 cups of flour, so I used 2 teaspoons of kosher salt in this recipe.  

Directions:

Place dry ingredients in a stand mixer or food processor. Add butter and mix or pulse until broken down to sizes varying from peas to almonds to walnuts. Pour mixture into a large bowl and add the smaller amount of water recommended. Toss together and squeeze the dough to determine if more water is needed. The dough should just hold together, with shaggy dry areas as well as areas that are moister. If the dough is too dry, add the remaining water and toss. Wrap into a rough square in plastic wrap. Chill overnight.

After the dough has chilled, unwrap it onto a floured surface. Pat the dough into a square, then use a rolling pin to roll it into a rectangle about 8 1/2 x 14 inches. The dough will crumble and be rough around the edges, but don't add more flour or water — it will come together during rolling.

For the first "turn," fold the dough into thirds, like a letter. The seam should be on the left side. Chill 30 minutes.

For the second turn, take the dough out, this time with the seam at the bottom. Again roll the dough into an 8 1/2 x 14 inch rectangle and repeat the previous step. Chill 30 minutes.

For the third turn, repeat the previous step, then wrap the dough in plastic and chill for at least 2 hours and preferably overnight.

After chilling, divide dough into four equal parts.  Wrap and chill unused portions of dough until ready to use.  Flour surface, and dust both sides of dough portion.  Thwak the dough a few times with the rolling pin.  Begin to roll the dough, stopping periodically to loosen the dough from the surface below and rotate.  Roll into a thickness of approximately 1/8".  Check the size is larger than the pie plate.  Loosen the dough, and drape over the rolling pin to set the bottom crust into the pie plate.  Form to the pie plate, and trim the excess dough.  Retrieve another dough portion, and roll to form the top crust.  Once the dough is rolled out, use a large plate as template to cut a circle.  Move to a sheet pan.  Wrap top and bottom loosely, and put in the freezer.  Repeat with remaining dough portions to make a second pie.  Alternately, keep chilled or freeze for future use.  Any scraps may be re-used; knead together and chill, covered, for at least 30 minutes before re-rolling.       

While crusts are freezing, pre-heat oven to 375°F.  Prepare egg wash.  When crusts are frozen, line a baking sheet with foil or parchment paper to catch any drips.  Place filing in bottom crust.  Brush crust along the rim with egg wash.  Place top crust, and lightly press to seal.  Brush top with egg wash.  Decorate as desired, and cut venting slits.  Bake for approximately 45 minutes, rotating pan halfway through.  Pie is done when the crust is dark brown, and the filling is bubbling.  Allow to cool about 30-60 minutes before serving.  


Yum!


Flaky goodness


Roll and cut extra dough, brush with egg wash and sprinkle with cinnamon sugar.
Bake about 15 minutes at 375°F, rotating pan halfway.
I wish I had some of these right now.  I could eat a whole tray!


Saturday, August 31, 2013

The August Break 2013 - Day 31! - Smile
“Sometimes your joy is the source of your smile, 
but sometimes your smile can be the source of your joy.” 
― Thích Nhất Hạnh


Today is the last day of The August Break!
Thanks everyone for coming along on the journey.
See ya around the blog for the regular programming.

Hugs,
Tara

*****

"Like" the SBE companion Facebook page,
a community for sharing beauty found in everyday life.

*****

Read more about The August Break 2013
Also see participant photos at Flickr and Instagram (#augustbreak2013)